 It
has a square coupling flange fixed to it so that it can be joined to more
waveguide. Round flanges are also common and can be linked to each other
with special coupling rings. The square flanges are joined together with
nuts and bolts.
INTRODUCTION:
So you want to try microwaves? These notes will help you to get started! To the seasoned microwaver, this information is old stuff and he or she would not now be using the type of equipment I describe below. However, if you are an absolute newcomer to the microwave region, then this is the easiest and cheapest way to make a start. If you then fail to catch the "microwave bug" you won't have spent a great deal in the first place....
Once you and a friend have each made this simple equipment you can have lots of fun finding out how the microwave bands work, how to set up dish antennas and how to choose a good site from which to operate. The gear is so lightweight and portable that "hill-topping" becomes a real delight. You definitely need a friend with similar interest in microwaves if you are to try out your own gear.
Once again... the equipment described here is SIMPLE. It operates on the 10GHz (or 3 centimetre) amateur band. The results to be obtained from it will not be as good as the results achieved by higher-powered ssb/cw stations. Nevertheless you will get quite a few surprises! This equipment is what most of we "veterans" were using in the 1970s and 80s. I had some excellent long distance (DX) contacts with the little transceiver described here. Although the power output is only a few milliwatts I managed to equal the U.K line-of-sight record distance of 245km with it.
Until about three years ago, the world record for a 10GHz amateur contact was held by Italian operators who used simple wideband FM equipment like this. They worked a path exceeding 1600 kilometres!
The reason I am resurrecting old technology here is that I firmly believe that this is the best route and apprenticeship for someone who has no previous experience of microwaves, no previous knowledge of working with surface mount components and microstrip techniques and perhaps limited constructional experience on other bands. To go head first into modern narrowband techniques at microwaves involves serious constructional know-how and access to precision test equipment. None of this is required for what I describe right here! Once you have played around with the simple gear, I hope you continue your microwave work and build your own advanced narrowband equipment. You will have served your apprenticeship by then and be ready to enter the microwave world of the "big boys"! Your simple transceiver could even become a useful item of test equipment so you will not have wasted your time making it.
Don't let the narrowbanders put you off this simple
gear! Most of them made similar stuff years ago and sometimes
forget that fact! Of course, if you are technically proficient and maybe
professionally involved in electronics, you might want to skip this simple
approach... so feel free to do just that!
SOME MICROWAVE TERMINOLOGY:
This simple equipment is commonly called by the term "Gunnplexer" in the USA, although that name was originally given to a commercial microwave unit produced by Microwave Associates in the 1970s. Essentially it is a simple oscillator transmitter and a diode receiver. Modulation is applied to the oscillator, a GUNN DIODE, to produce WIDEBAND FM. The receiver section is simply a microwave mixer diode which receives its local oscillator injection from the same Gunn diode mentioned earlier.
Both the Gunn diode and mixer diode are housed in a short length of WAVEGUIDE, a rectangular copper or brass extrusion which has been manufactured to a high degree of precision. Waveguide for 10GHz is called Waveguide 16 in the UK (WR90 in the USA). Its internal dimensions are 22.86mm x 10.16mm. In making the CAVITY (enclosure) for the two diodes, WG16 is cut and drilled to very accurate dimensions.
In this article we use a surplus, commercial Gunn module. There are many types available. They were originally made for doppler radar surveillance systems such as burglar or intruder alarms.
Frequency change is made by varying the Gunn supply voltage between approximately 6 to 9 volts. This is a fairly crude method however as the best modulation characteristic usually occurs at a specific voltage. You can mechanically tune the module by adjusting a tuning screw, in and out of the cavity. Many microwavers in the 1970's and 80s replaced the existing screw with a micrometer head and spring-loaded Teflon (PTFE) rod. In this way they achieved an accurate, resettable tuning system.
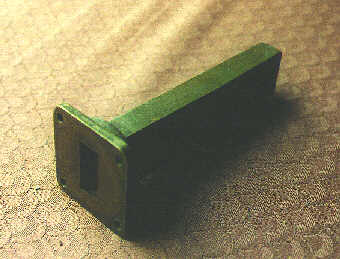
This photo shows some waveguide 16.  It
has a square coupling flange fixed to it so that it can be joined to more
waveguide. Round flanges are also common and can be linked to each other
with special coupling rings. The square flanges are joined together with
nuts and bolts.
While it is certainly possible to make your own Gunn diode waveguide cavity, I am not asking you to do that! You can buy ready made modules, at cheap prices, on the surplus market (eg at hamfests, flea markets and club junk sales). These modules are DOPPLER RADAR units of the type used for home and business security such as burglar/intruder alarms or for remote opening of garage doors.
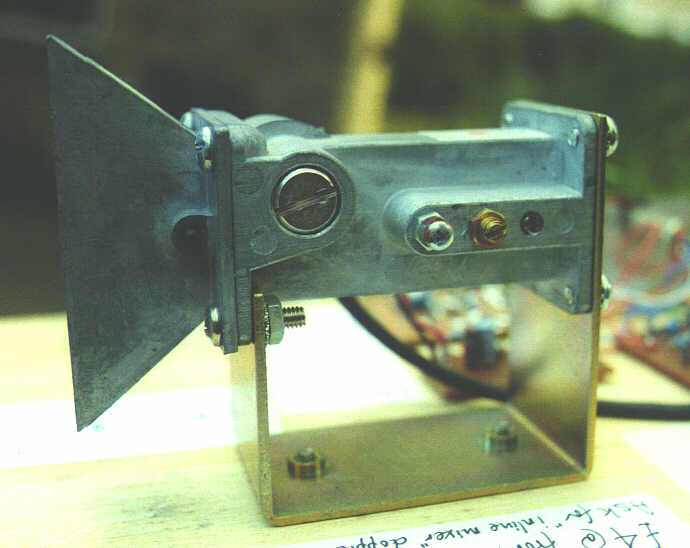
The doppler module pictured below is the SOLFAN module, still available (1998) in quantity in the UK. It is also available in the USA and Canada. At the end of this article you will find a list of suppliers of this and similar modules.

The Solfan module is a simple Gunn diode/mixer diode cavity that transmits and receives, at the same time, in the 10GHz band. It usually comes complete with it own antenna, a small horn.
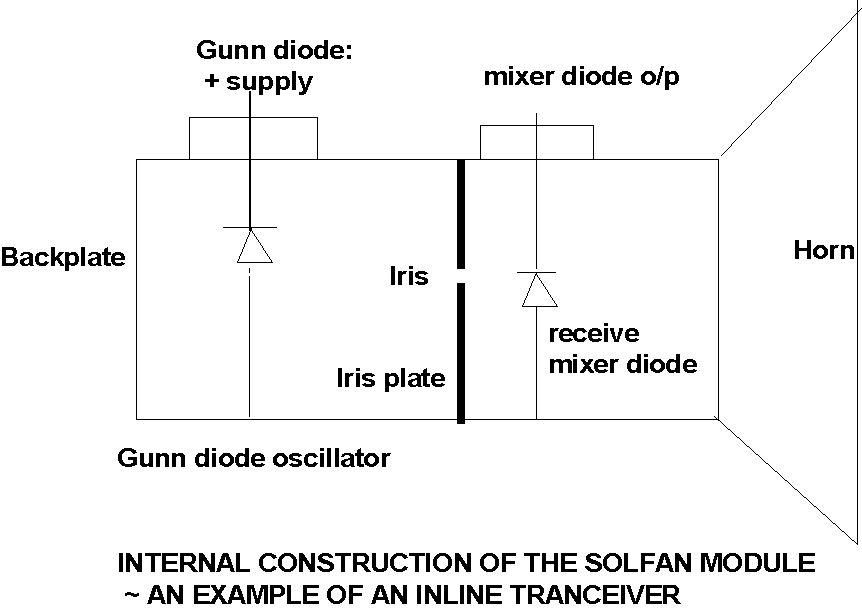
The diagram following the photo shows the internal construction
of the unit. It works as a simple variable oscillator on transmit and a
diode mixer on receive, the local oscillator for this mixer being the same
Gunn diode as the transmitter and on the same frequency as used on transmit.
Thus the TX and RX frequencies will differ by the frequency of the IF,
which can be anything you like, within reason.

The iris plate is used to define the size of the Gunn cavity and helps to (a) stabilise the oscillator, reducing pulling effects due to changing loads or hand capacity effects and (b) to help determine the amount of Gunn RF reaching the receive mixer diode, thus, with the aid of a tuning screw, allowing you to set the mixer injection to the optimum for best noise figure. This setting does not usually coincide with maximum RF out, by the way.
Other doppler modules can be found. If you see one and wish to buy it, just do a few checks before you part with your money (usually less than £10 sterling or US$16):
Handle these units with care. The mixer diodes are prone to static damage so avoid touching them unless the terminals are connected to ground through a resistor or shorting link.
10GHz doppler modules can be obtained from the following suppliers:
U.K: Mainline Electronics, PO Box 235 Leicester, LE2 9SH, England.
(Telephone UK 0116 277 7648 or FAX 0116 247 7551)
USA: SHF Microwave Parts Co., 7102 W. 500 S, La Porte, Indiana 46350, USA. (No telephone dealing) They also have a website at: http://www.shfmicro.com and/or email at: prutz@shfmicro.com
Take a look at this because they have some real bargain items!
ARRL HANDBOOK 1993 (and maybe others) pp32-45 - how to use FM broadcast receivers as microwave IF strips. Pp32-54 describes how to modulate a Gunn diode.
ARRL UHF/MICROWAVE PROJECTS MANUAL (Volumes 1 and 2) http://www.arrl.org